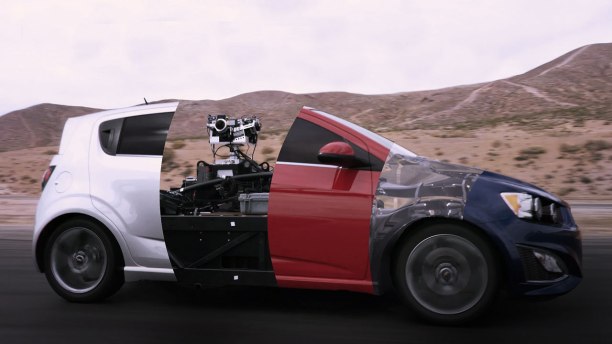
In collaboration with JemFX, Performance Filmworks and Keslow Camera, the Mill teamed created The Mill BLACKBIRD, the first fully adjustable car rig that creates photoreal CG cars. Acting as a production tool to inspire car brands, agencies and film-makers to do things in new, innovative and efficient ways, The Mill BLACKBIRD sets out to transform the way automotive content is made – it’s a car rig that can be shot at any time, in any location, without the need to rely on a physical car.
The Mill BLACKBIRD® inspires and expands creative opportunities, offering a truly flexible production tool without sacrificing any quality or direction.
The Mill BLACKBIRD® is able to capture quality footage and data due to its camera array and tailor-made stabilisation unit, engineered in collaboration with Performance Filmworks’ legendary, multi award winning technician, Lev Yevstratov.
A combination of high dynamic range imagery and 3D laser scanning generates a virtual version of the environment, producing 100% realistic CG renderings. The Mill has taken this a step further, developing a bespoke BLACKBIRD® AR application that allows you to see the intended vehicle in CG, tracked live over the rig on location.
Adobe continues to deliver technology that opens unimagined creative opportunities for video and film production, and now, immersive experiences. In the next release of Creative Cloud – available in early summer – Premiere Pro CC will add new virtual reality capabilities, including “field of view” mode for spherical stitched media.
Edit immediately during ingest allows Premiere Pro CC users to get straight to work, while importing their video and audio files in the background, and switch between native and proxy formats freely when using multiple devices. With initial support for Apple Metal and H.264 hardware decoding (Windows Intel Iris only), you get maximum performance.
Access advanced workflows for working with immersive VR & 360 video experiences.
The next version of After Effects CC is faster and more reliable from file import and project load through to final render. Scrubbing the timeline, working with complex masks, and editing large numbers of keyframes is now more fluid, thanks to accelerated interface interactions.
The next update to Adobe Audition introduces the Essential Sound panel, revolutionizing the way you mix and edit projects. The simple, intuitive interface ensures mixes sound clear, clean, and professional – without needing to be an audio production expert.
New media management capabilities coming to Adobe Premiere Pro and Adobe Media Encoder let you work the way you want to, on the device you choose.
Adobe Character Animator, a new tagging system allows you to quickly prepare characters for animation. Expanded export options make it easy to output to a variety video formats with Adobe Media Encoder.
New features in the Lumetri color panel and Lumetri scopes allow you to be more creative with color than ever. New HSL Secondaries allow for quick, intuitive selection of color ranges within a shot, getting the perfect nuance with a few clicks. And the entire collection of beautiful SpeedLooks linear looks help give your media instant personality. Support for color control surfaces like the Tangent Elements, Wave and Ripple enable even advanced colorists to feel right at home, and enhanced Lumetri scopes give instant feedback, with new control over brightness, improved resolution, and support for monitoring Rec2020 colorspace.
Follow a fully linear workflow from picture edit completed in Premiere Pro, audio mixed in Audition, and final deliverables rendered and published with Media Encoder.
Export animated 3D text and shape layers to Cinema 4D for a roundtrip Live 3D motion graphics workflow. Customize your exported elements in Cinema 4D (Cinema 4D Lite is included with After Effects), save your changes, and see them update live in After Effects via CINEWARE.
Adobe Media Encoder help streamline the full production workflow – from initial ingest through to final output. The media browser makes it easy
This is a list of the keyboard shortcuts that I use most frequently in my day to day editing that help me edit faster. I’m a big fan of keyboard shortcuts. Many commands have keyboard shortcut equivalents, so we can complete tasks with minimal use of the mouse.
Of course, these are the default keyboard shortcuts that come standard in Premiere Pro CC. However, if you’re coming to Premiere Pro CC from another Non-linear editing software, you can set shortcuts to match shortcuts in other software you use.
Results
Windows
Mac OS
File
Project
Ctrl+Alt+N
Opt+Cmd+N
Sequence…
Ctrl+N
Cmd+N
Bin
Ctrl+B
Cmd+B
Title…
Ctrl+T
Cmd+T
Open Project
Ctrl+O
Cmd+O
Browse in Adobe Bridge…
Ctrl+Alt+O
Opt+Cmd+O
Close Project
Ctrl+Shift+W
Shift+Cmd+W
Close
Ctrl+W
Cmd+W
Save
Ctrl+S
Cmd+S
Save As…
Ctrl+Shift+S
Shift+Cmd+S
Save a Copy…
Ctrl+Alt+S
Opt+Cmd+S
Capture…
F5
F5
Batch Capture…
F6
F6
Import from Media Browser
Ctrl+Alt+I
Opt+Cmd+I
Import…
Ctrl+I
Cmd+I
Export Media…
Ctrl+M
Cmd+M
Get Properties for Selection…
Ctrl+Shift+H
Shift+Cmd+H
Exit
Ctrl+Q
Cmd+Q
Edit
Undo
Ctrl+Z
Cmd+Z
Redo
Ctrl+Shift+Z
Shift+Cmd+Z
Cut
Ctrl+X
Cmd+X
Copy
Ctrl+C
Cmd+C
Paste
Ctrl+V
Cmd+V
Paste Insert
Ctrl+Shift+V
Shift+Cmd+V
Paste Attributes
Ctrl+Alt+V
Opt+Cmd+V
Clear
Delete
Forward Delete
Ripple Delete
Shift+Delete
Shift+Forward Delete
Duplicate
Ctrl+Shift+/
Shift+Cmd+/
Select All
Ctrl+A
Cmd+A
Deselect All
Ctrl+Shift+A
Shift+Cmd+A
Find…
Ctrl+F
Cmd+F
Edit Original
Ctrl+E
Cmd+E
Keyboard Shortcuts
Ctrl+Alt+K
Cmd+Opt+K
Clip
Make Subclip…
Ctrl+U
Cmd+U
Audio Channels…
Shift+G
Shift+G
Speed/Duration…
Ctrl+R
Cmd+R
Insert
,
,
Overwrite
.
.
Enable
Shift+E
Shift+Cmd+E
Link
Ctrl+L
Cmd+L
Group
Ctrl+G
Cmd+G
Ungroup
Ctrl+Shift+G
Shift+Cmd+G
Sequence
Render Effects in Work
Area/In to Out
Enter
Return
Match Frame
F
F
Reverse Match Frame
Shift+R
Shift+R
Add Edit
Ctrl+K
Cmd+K
Add Edit to All Tracks
Ctrl+Shift+K
Shift+Cmd+K
Trim Edit
T
T
Extend Selected Edit to
Playhead
E
E
Apply Video Transition
Ctrl+D
Cmd+D
Apply Audio Transition
Ctrl+Shift+D
Shift+Cmd+D
Apply Default Transitions
to Selection
Shift+D
Shift+D
Lift
;
;
Extract
‘
‘
Zoom In
=
=
Zoom Out
–
–
Go to Gap
Next in Sequence
Shift+;
Shift+;
Previous in Sequence
Ctrl+Shift+;
Opt+;
Snap
S
S
Marker
Mark In
I
I
Mark Out
O
O
Mark Clip
X
X
Mark Selection
/
/
Go to In
Shift+I
Shift+I
Go to Out
Shift+O
Shift+O
Clear In
Ctrl+Shift+I
Opt+I
Clear Out
Ctrl+Shift+O
Opt+O
Clear In and Out
Ctrl+Shift+X
Opt+X
Add Marker
M
M
Go to Next Marker
Shift+M
Shift+M
Go to Previous Marker
Ctrl+Shift+M
Shift+Cmd+M
Clear Current Marker
Ctrl+Alt+M
Opt+M
Clear All Markers
Ctrl+Alt+Shift+M
Opt+Cmd+M
Type Alignment
Left
Ctrl+Shift+L
Shift+Cmd+L
Center
Ctrl+Shift+C
Shift+Cmd+C
Right
Ctrl+Shift+R
Shift+Cmd+R
Tab Stops…
Ctrl+Shift+T
Shift+Cmd+T
Templates…
Ctrl+J
Cmd+J
Select
Next Object Above
Ctrl+Alt+]
Opt+Cmd+]
Next Object Below
Ctrl+Alt+[
Opt+Cmd+[
Arrange
Bring to Front
Ctrl+Shift+]
Shift+Cmd+]
Bring Forward
Ctrl+]
Cmd+]
Send to Back
Ctrl+Shift+[
Shift+Cmd+[
Send Backward
Ctrl+[
Cmd+[
Window
Workspace
Reset Current
Workspace…
Alt+Shift +0
Opt+Shift +0
Audio Clip Mixer
Shift+9
Shift+9
Audio Track Mixer
Shift+6
Shift+6
Effect Controls
Shift+5
Shift+5
Effects
Shift+7
Shift+7
Media Browser
Shift+8
Shift+8
Program Monitor
Shift+4
Shift+4
Project
Shift+1
Shift+1
Source Monitor
Shift+2
Shift+2
Timelines
Shift+3
Shift+3
Show/hide application title
Ctrl+\
Cmd+\
Help
Adobe Premiere Pro
Help…
F1
F1
Keyboard…
Add Tracks to Match
Source
Clear Poster Frame
Ctrl+Shift+P
Opt+P
Cut to Camera 1
Ctrl+1
Ctrl+1
Cut to Camera 2
Ctrl+2
Ctrl+2
Cut to Camera 3
Ctrl+3
Ctrl+3
Cut to Camera 4
Ctrl+4
Ctrl+4
Cut to Camera 5
Ctrl+5
Ctrl+5
Cut to Camera 6
Ctrl+6
Ctrl+6
Cut to Camera 7
Ctrl+7
Ctrl+7
Cut to Camera 8
Ctrl+8
Ctrl+8
Cut to Camera 9
Ctrl+9
Decrease Clip Volume
[
[
Decrease Clip Volume Many
Shift+[
Shift+[
Expand All Tracks
Shift+=
Shift+=
Export Frame
Ctrl+Shift+E
Shift+E
Extend Next Edit To
Playhead
Shift+W
Shift+W
Extend Previous Edit To
Playhead
Shift+Q
Shift+Q
Panels
Audio Mixer Panel Menu
Show/Hide Tracks…
Ctrl+Alt+T
Opt+Cmd+T
Loop
Ctrl+L
Cmd+L
Meter Input(s) Only
Ctrl+Shift+I
Ctrl+Shift+I
Capture Panel
Record Video
V
V
Record Audio
A
A
Eject
E
E
Fast Forward
F
F
Go to In point
Q
Q
Go to Out point
W
W
Record
G
G
Rewind
R
R
Step Back
Left
Left
Step Forward
Right
Right
Stop
S
S
Effect Controls Panel
Menu
Remove Selected Effect
Backspace
Delete
Effects Panel Menu
New Custom Bin
Ctrl+/
Cmd+/
Delete Custom Item
Backspace
Delete
History Panel Menu
Step Backward
Left
Left
Step Forward
Right
Right
Delete
Backspace
Delete
Open in Source Monitor
Shift+O
Shift+O
Parent Directory
Ctrl+Up
Cmd+Up
Select Directory List
Shift+Left
Shift+Left
Select Media List
Shift+Right
Shift+Right
Loop
Ctrl+L
Cmd+L
Play
Space
Space
Go to Next Edit Point
Down
Down
Go to Previous Edit Point
Up
Up
Play/Stop Toggle
Space
Space
Record On/Off Toggle
0
0
Step Back
Left
Left
Step Forward
Right
Right
Loop
Ctrl+L
Cmd+L
Tools
Selection Tool
V
V
Track Select Tool
A
A
Ripple Edit Tool
B
B
Rolling Edit Tool
N
N
Rate Stretch Tool
R
R
Razor Tool
C
C
Slip Tool
Y
Y
Slide Tool
U
U
Pen Tool
P
P
Hand Tool
H
H
Zoom Tool
Z
Z
Multi Camera
Result
Windows
Mac OS
Go to Next Edit Point
Down
Down
Go to Next Edit Point on Any Track
Shift+Down
Shift+Down
Go to Previous Edit Point
Up
Up
Go to Previous Edit Point on Any Track
Shift+Up
Shift+Up
Go to Selected Clip End
Shift+End
Shift+End
Go to Selected Clip Start
Shift+Home
Shift+Home
Go to Sequence-Clip End
End
End
Go to Sequence-Clip Start
Home
Home
Increase Clip Volume
]
]
Increase Clip Volume Many
Shift+]
Shift+]
Maximize or Restore Active Frame
Shift+`
Shift+`
Maximize or Restore Frame Under Cursor
`
`
Minimize All Tracks
Shift+-
Shift+-
Play Around
Shift+K
Shift+K
Play In to Out
Ctrl+Shift+Space
Opt+K
Play In to Out with Preroll/Postroll
Shift+Space
Shift+Space
Play from Playhead to Out Point
Ctrl+Space
Ctrl+Space
Play-Stop Toggle
Space
SpaceRecord Voiceover
Reveal Nested Sequence
Ctrl+Shift+F
Shift+T
Ripple Trim Next Edit To Playhead
W
W
Ripple Trim Previous Edit To Playhead
Q
Q
Select Camera 1
1
1
Select Camera 2
2
2
Select Camera 3
3
3
Select Camera 4
4
4
Select Camera 5
5
5
Select Camera 6
6
6
Select Camera 7
7
7
Select Camera 8
8
8
Select Camera 9
9
9
Select Find Box
Shift+F
Shift+F
Select Clip at Playhead
D
D
Select Next Clip
Ctrl+Down
Cmd+Down
Select Next Panel
Ctrl+Shift+.
Ctrl+Shift+.
Select Previous Clip
Ctrl+Up
Cmd+Up
Select Previous Panel
Ctrl+Shift+,
Ctrl+Shift+,
Set Poster Frame
Shift+P
Cmd+P
Shuttle Left
J
J
Shuttle Right
L
L
Shuttle Slow Left
Shift+J
Shift+J
Shuttle Slow Right
Shift+L
Shift+L
Shuttle Stop
K
K
Step Back
Left
Left
Step Back Five Frames – Units
Shift+Left
Shift+Left
Step Forward
Right
Right
Step Forward Five Frames – Units
Shift+Right
Shift+Right
Toggle All Audio Targets
Ctrl+9
Cmd+9
Toggle All Source Audio
Ctrl+Alt+9
Opt+Cmd+9
Toggle All Source Video
Ctrl+Alt+0
Opt+Cmd+0
Toggle All Video Targets
Ctrl+0
Cmd+0
Toggle Audio During Scrubbing
Shift+S
Shift+S
Toggle Control Surface Clip Mixer Mode
Toggle Full Screen
Ctrl+`
Ctrl+`
Toggle Multi-Camera View
Shift+0
Shift+0
Toggle Trim Type
Shift+T
Ctrl+T
Trim Backward
Ctrl+Left
Opt+Left
Trim Backward Many
Ctrl+Shift+Left
Opt+Shift+Left
Trim Forward
Ctrl+Right
Opt+Right
Trim Forward Many
Ctrl+Shift+Right
Opt+Shift+Right
Trim Next Edit to Playhead
Ctrl+Alt+W
Opt+W
Trim Previous Edit to Playhead
Ctrl+Alt+Q
Opt+Q
Project Panel
Result
Windows
Mac OS
Workspace 1
Alt+Shift+1
Opt+Shift+1
Workspace 2
Alt+Shift+2
Opt+Shift+2
Workspace 3
Alt+Shift+3
Opt+Shift+3
Workspace 4
Alt+Shift+4
Opt+Shift+4
Workspace 5
Alt+Shift+5
Opt+Shift+5
Workspace 6
Alt+Shift+6
Opt+Shift+6
Workspace 7
Alt+Shift+7
Opt+Shift+7
Workspace 8
Alt+Shift+8
Opt+Shift+8
Workspace 9
Alt+Shift+9
Opt+Shift+9
Zoom to Sequence
\
\
Extend Selection Up
Shift+Up
Shift+Up
Move Selection Down
Down
Down
Move Selection End
End
End
Move Selection Home
Home
Home
Move Selection Left
Left
Left
Move Selection Page Down
Page Down
Page Down
Move Selection Page Up
Page Up
Page Up
Move Selection Right
Right
Right
Move Selection Up
Up
Up
Next Column Field
Tab
Tab
Next Row Field
Enter
Return
Open in Source Monitor
Shift+O
Shift+O
Previous Column Field
Shift+Tab
Shift+Tab
Previous Row Field
Shift+Enter
Shift+Return
Thumbnail Size Next
Shift+]
Shift+]
Thumbnail Size Previous
Shift+[
Shift+[
Toggle View
Shift+\
Shift+\
Timeline Panel
Result
Windows
Mac OS
Add Clip Marker
Ctrl+1
Clear Selection
Backspace
Delete
Decrease Audio Tracks Height
Alt+-
Opt+-
Decrease Video Tracks Height
Ctrl+-
Cmd+-
Increase Audio Tracks Height
Alt+=
Opt+=
Increase Video Tracks Height
Ctrl+=
Cmd+=
Nudge Clip Selection Left Five Frames
Alt+Shift+Left
Shift+Cmd+Left
Nudge Clip Selection Left One Frame
Alt+Left
Cmd+Left
Nudge Clip Selection Right Five Frames
Alt+Shift+Right
Shift+Cmd+Right
Nudge Clip Selection Right One Frame
Alt+Right
Cmd+Right
Ripple Delete
Alt+Backspace
Opt+Delete
Set Work Area Bar In Point
Alt+[
Opt+[
Set Work Area Bar Out Point
Alt+]
Opt+]
Show Next Screen
Page Down
Page Down
Show Previous Screen
Page Up
Page Up
Slide Clip Selection Left Five Frames
Alt+Shift+,
Opt+Shift+,
Slide Clip Selection Left One Frame
Alt+,
Opt+,
Slide Clip Selection Right Five Frames
Alt+Shift+.
Opt+Shift+.
Slide Clip Selection Right One Frame
Alt+.
Opt+.
Slip Clip Selection Left Five Frames
Ctrl+Alt+Shift+Left
Opt+Shift+Cmd+Left
Slip Clip Selection Left One Frame
Ctrl+Alt+Left
Opt+Cmd+Left
Slip Clip Selection Right Five Frames
Ctrl+Alt+Shift+Right
Opt+Shift+Cmd+Right
Slip Clip Selection Right One Frame
Ctrl+Alt+Right
Opt+Cmd+Right
Titler
Result
Windows
Mac OS
Arc Tool
A
A
Bold
Ctrl+B
Cmd+B
Decrease Kerning by Five Units
Alt+Shift+Left
Opt+Shift+Left
Decrease Kerning by One Unit
Alt+Left
Opt+Left
Decrease Leading by Five Units
Alt+Shift+Down
Opt+Shift+Down
Decrease Leading by One Unit
Alt+Down
Opt+Down
Decrease Text Size by Five Points
Ctrl+Alt+Shift+Left
Opt+Shift+Cmd+Left
Decrease Text Size by One Point
Ctrl+Alt+Left
Opt+Cmd+Left
Ellipse Tool
E
E
Increase Kerning by Five Units
Alt+Shift+Right
Opt+Shift+Right
Increase Kerning by One Unit
Alt+Right
Opt+Right
Increase Leading by Five Units
Alt+Shift+Up
Opt+Shift+Up
Increase Leading by One Unit
Alt+Up
Opt+Up
Increase Text Size by Five Points
Ctrl+Alt+Shift+Right
Opt+Shift+Cmd+Right
Increase Text Size by One Point
Ctrl+Alt+Right
Opt+Cmd+Right
Insert Copyright Symbol
Ctrl+Alt+Shift+C
Opt+Shift+Cmd+C
Insert Registered Symbol
Ctrl+Alt+Shift+R
Opt+Shift+Cmd+R
Italic
Ctrl+I
Cmd+I
Line Tool
L
L
Nudge Selected Object Down by Five Pixels
Shift+Down
Shift+Down
Nudge Selected Object Down by One Pixel
Down
Down
Nudge Selected Object Left by Five Pixels
Shift+Left
Shift+Left
Nudge Selected Object Left by One Pixel
Left
Left
Nudge Selected Object Right by Five Pixels
Shift+Right
Shift+Right
Nudge Selected Object Right by One Pixel
Right
Right
Nudge Selected Object Up by Five Pixels
Shift+Up
Shift+Up
Nudge Selected Object Up by One Pixel
Up
Up
Path Type Tool
Pen Tool
P
P
Position Object(s) to Bottom Title Safe Margin
Ctrl+Shift+D
Shift+Cmd+D
Position Object(s) to Left Title Safe Margin
Ctrl+Shift+F
Shift+Cmd+F
Position Object(s) to Top Title Safe Margin
Ctrl+Shift+O
Shift+Cmd+O
Rectangle Tool
R
R
Rotation Tool
O
O
Selection Tool
V
V
Type Tool
T
T
Underline
Ctrl+U
Cmd+U
Vertical Type Tool
C
C
Wedge Tool
W
W
Trim Monitor Panel
Result
Windows
Mac OS
Focus Both Outgoing and Incoming
Alt+1
Opt+1
Focus on Incoming Side
Alt+3
Opt+3
Focus on Outgoing Side
Alt+2
Opt+2
Loop
Ctrl+L
Cmd+L
Trim Backward by Large Trim Offset
Alt+Shift+Left
Opt+Shift+Left
Trim Backward by One Frame
Alt+Left
Opt+Left
Trim Forward by Large Trim Offset
Alt+Shift+Right
Opt+Shift+Right
Trim Forward by One Frame
Alt+Right
Opt+Right
Commands that are blank in the above table can be customized in the Keyboard Customization (Windows) or Keyboard Shortcuts (Mac OS) dialog box.
Real Estate Video Marketing is one of the best way to appeal to the emotional, subjective factors. When people think of real estate video, they usually think of home walkthroughs and videos of property images & surrounding area . These videos gives feeling to customers that they are in there dream home and they can see infrastructure of property. Just like any other form of marketing though, poor video marketing methods can turn off a buyer or seller just as quickly as it reels them in.
Video has taken over our Facebook feed, our email inboxes, youtube and even our beloved Whatsapp. But before you rush out and make a video with your smartphone, consider a few reasons why hiring a professional is in your best interest. Professional real estate videos can help increase customer conversions by up to 150% By seeing your listings before they contact you, buyers feel more comfortable when they do make contact We take all of the stress and headache out of creating these unique videos – you sell homes, we make videos for you If you’re not using video yet, you’re missing out on a huge pool of potential buyers who wants to watch it
Video marketing is now a popular avenue to promote a business because it is an effective way to communicate with your Customers/Audience. Social media platforms like Facebook, Whats-app, YouTube & Vimeo etc, have millions of users uploading, watching, commenting, and sharing videos everyday for the last several years. 70% of social media users would rather watch a video than look at a picture or read a paragraph of writing.
Absolutely without a doubt, video marketing is going to be the future of the internet business. If you are serious in either starting your own business, selling your products, or even if you have established your business but have not ventured yet into video marketing then, it is a must for you to get started. Showcasing your products through videos is much easier for a customer to understand the product. If your business is based on products or services that require a demonstration, you will find video marketing the only effective solution.
Video marketing is a new type of internet marketing and advertising in which business create 2-5 minute short videos about specific topics using content from articles and other text sources. Our brains processes visual information 60,000 times faster than words, and one minute of video is considered equivalent to around 1.8 million words. Video based marketing is said to increase qualified marketing leads 512% and revenue by more than 6x.
So, where do you start? How, in short, do you make a meaningful piece of video? Well, that’s why we are here. To help you tell a concise and meaningful story